-

Oracle SOA/BPM Suite 11.1.1.7 HA, EDG-based installation - Part II
This is the second and last part of the posts regarding the installation of a EDG-based SOA HA installation. The first part handled the configuration of the environment, this post will explain how to correctly configure the WebLogic domain, and the SOA applications for a highly available setup.
SOA Domain Configuration
1. Create Domain
- Connect to a GUI desktop on server testserver1
- Execute $SOA_HOME/common/bin/config.sh
- Select "Create a new WebLogic Domain"
- Select products to configure:
- Oracle BPM Suite
- Oracle SOA Suite
- Oracle Enterprise Manager
- Oracle Business Activity Monitoring
- Oracle WSM Policy Manager
- Oracle JRF

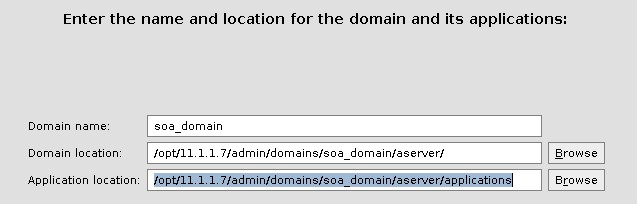
2. Define domain name, domain location and application location
- Domain name: soa_domain
- Domain Location: /opt/11.1.1.7/admin/domains/soa_domain/aserver/
- Application Location: /opt/11.1.1.7/admin/domains/soa_domain/aserver/applications
- Define WebLogic user password
- Select WebLogic Startup Mode. Choose "Production mode"
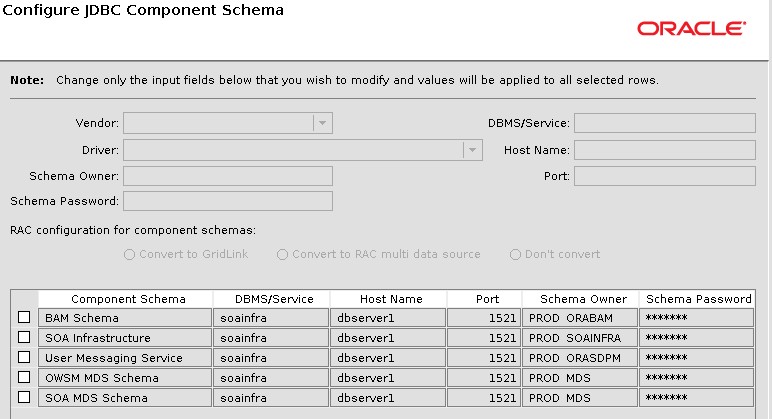
- Configure JDBC Component Schemas. You should carefuly fill this information with the name of the schemas created with RCU and the database connection information. After filling this page out, there will be connection testing of all datasources, every test should finish with a green mark and a "Succesful" message. For common fields as Vendor, Driver, Service, Host Name and Port, select all schemas at the same time and modify the fields on the top only once
3. Select optional configuration steps:
- Administration Server
- Managed Servers, Clusters and Machines
- Deployment and services
- JMS File Store
4. Configure the Administration Server
- Name: AdminServer
- Listen Address: adminsoa-prod.mydom.com
- Listen Port: 7001
5. Configure Managed Servers.
On this step, is necessary to change the names of the managed servers already defined by the installer, and then create new ones for the second node of the cluster.
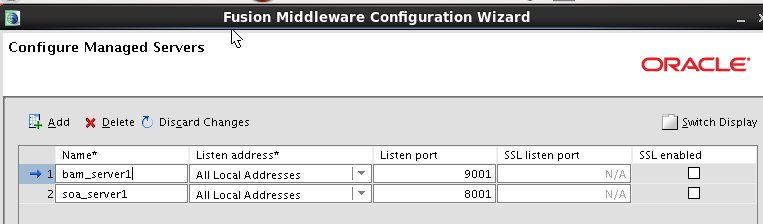
Change bam_server1 name to WLS_BAM1, and soa_server1 to WLS_SOA1.
Then, create 4 extra managed servers, the final list should look like this: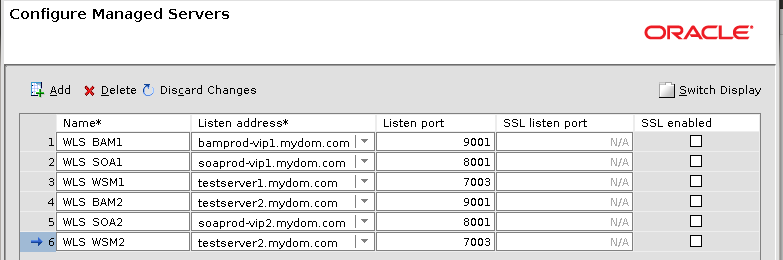
Please note that servers BAM1/SOA1/SOA2 listen on specially created VIPs, while WSM1/WSM2/BAM2 listen on hosts addresses.
6. Configure Clusters.
- Create the following clusters (all should use unicast communication):
- SOA_CLUSTER (add cluster address: soaprod-vip1.mydom.com,soaprod-vip2.mydom.com)
- BAM_CLUSTER
- WSM_CLUSTER
7. Assign Servers to Clusters:
- SOA_CLUSTER: WLS_SOA1/WLS_SOA2
- BAM_CLUSTER: WLS_BAM1/WLS_BAM2
- WSM_CLUSTER: WLS_WSM1/WLS_WSM2
8. Configure Machines.
Create 2 unix machines, listening on the default address and port
- testserver1.mydom.com/5556
- testserver2.mydom.com/5556
9. Assign Servers to Machines:
- testserver1.mydom.com: AdminServer/WLS_SOA1/WLS_WSM1/WLS_BAM1
- testserver2.mydom.com: WLS_SOA2/WLS_WSM2/WLS_BAM2
10. Target Deployments to Cluster or Servers:
- Select SOA_CLUSTER
- Unselect application WSM-PM
- Select BAM_CLUSTER
- Unselect application WSM-PM
- Select WSM_CLUSTER
- Select application WSM-PM
- Select DMS application
- Select AdminServer
- Unselect all oracle.soa.* libraries
- Unselect all oracle.sdp.* libraries
- Select SOA_CLUSTER

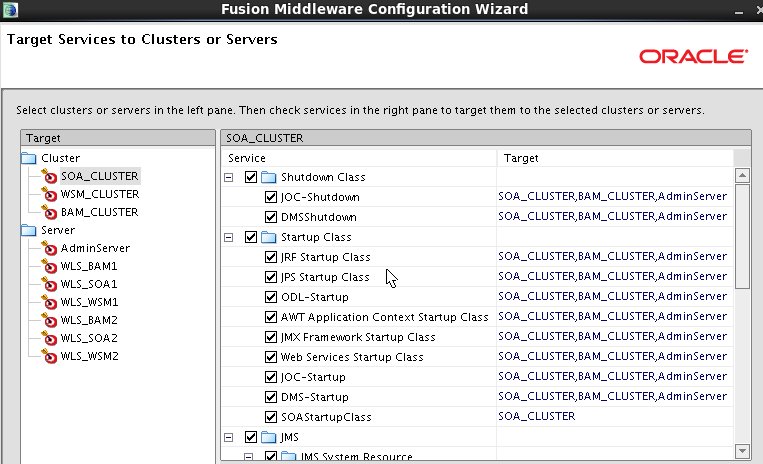
11. Target Services to Clusters or Servers:
- Select SOA_CLUSTER
- Unselect JDBC resource mds-owsm
- Select BAM_CLUSTER
- Unselect JDBC resource mds-owsm
- Select WSM_CLUSTER
- Select JDBC resource mdw-owsm
- Select SOA_CLUSTER
12. Configure JMS File Store.
Complete the Directory field according to the following table:
Name
Directory
PS6SOAJMSFileStore_Auto_1
/opt/11.1.1.7/admin/domains/soa_domain/aserver/SOA_CLUSTER/jms
PS6SOAJMSFileStore_Auto_1
/opt/11.1.1.7/admin/domains/soa_domain/aserver/SOA_CLUSTER/jms
UMSJMSFileStore_auto_1
/opt/11.1.1.7/admin/domains/soa_domain/aserver/SOA_CLUSTER/jms
UMSJMSFileStore_auto_2
/opt/11.1.1.7/admin/domains/soa_domain/aserver/SOA_CLUSTER/jms
UMSJMSFileStore_auto_3
/opt/11.1.1.7/admin/domains/soa_domain/aserver/BAM_CLUSTER/jms
UMSJMSFileStore_auto_4
/opt/11.1.1.7/admin/domains/soa_domain/aserver/BAM_CLUSTER/jms
BPMJMSFileStore_auto_1
/opt/11.1.1.7/admin/domains/soa_domain/aserver/SOA_CLUSTER/jms
BPMJMSFileStore_auto_2
/opt/11.1.1.7/admin/domains/soa_domain/aserver/SOA_CLUSTER/jms
SOAJMSFileStore_auto_1
/opt/11.1.1.7/admin/domains/soa_domain/aserver/SOA_CLUSTER/jms
SOAJMSFileStore_auto_2
/opt/11.1.1.7/admin/domains/soa_domain/aserver/SOA_CLUSTER/jms
AGJMSFileStore_auto_1
/opt/11.1.1.7/admin/domains/soa_domain/aserver/SOA_CLUSTER/jms
AGJMSFileStore_auto_2
/opt/11.1.1.7/admin/domains/soa_domain/aserver/SOA_CLUSTER/jms
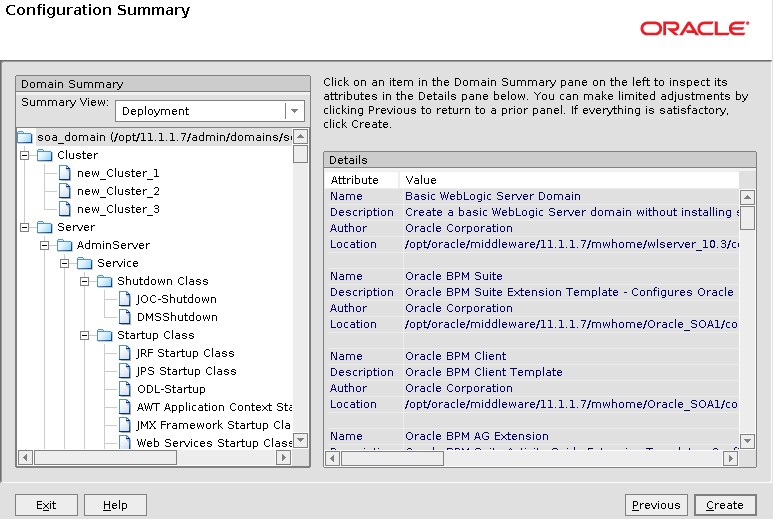
13. Create domain summary
14. Create boot.properties File
- Login to testserver1 as oracle
- Change directory to /opt/11.1.1.7/admin/domains/soa_domain/aserver/soa_domain
- Create AdminServer's security directory, then create boot.properties file with the username and password selected during domain creation
mkdir -p servers/AdminServer/security
vi servers/AdminServer/security/boot.properties
username=weblogic
password=xxxxxx
There should be no spaces after username or password and no new lines after or before those two.15. Start AdminServer VIP
- Login to testserver1 as oracle
- Change directory to /home/oracle/scripts
- Execute script adminVipUp.sh
16. Start AdminServer
- Login to testserver1 as oracle
- Change directory to /opt/11.1.1.7/admin/domains/soa_domain/aserver/soa_domain
- Execute script startWeblogic.sh. The AdminServer will be executing in the console session, do not close the console or press crtl+c until instructed to power down the AdminServer
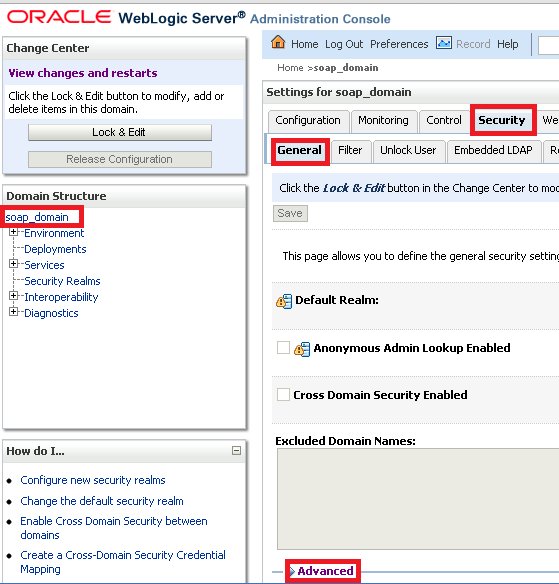
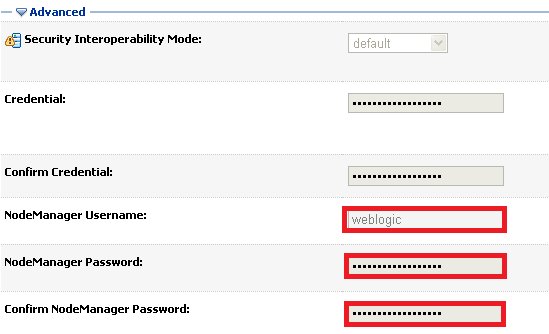
17. Configure NodeManager Credentials
- Login to WebLogic Administration Console on http://adminsoa-prod.mydom.com:7001/console
- Go to "soa_domain" on "Domain Structure", then go to the tab "Security", subtab "General", then "Advanced"
- Click on "Change Center" , button "Lock and Edit".
- Define NodeManager user as "weblogic", use the same password defined during the domain creation.
- Save and then Activate changes.
18. Apply JRF Template to WSM_CLUSTER
- Login to Fusion Middleware Enterprise manager on http://adminsoa-prod.mydom.com:7001/em
- Expand "Weblogic Domain", then expand "soa_domain" and click "WSM_CLUSTER"
- Click "Apply JRF Template" on the right panel
19. Stop AdminServer
Cancel the process running on the console using ctrl+c or stop the server from the AdminServer Console.
20. Edit setDomainEnv.sh
- Login to testserver1 as oracle
- Change directory to /opt/11.1.1.7/admin/domains/soa_domain/aserver/soa_domain/bin
- Edit the file setDomainEnv.sh with a text editor, find the following line
EXTRA_JAVA_PROPERTIES="${EXTRA_JAVA_PROPERTIES} -Dsoa.archives.dir=${SOA_ORACLE_HOME}/soa -Dsoa.oracle.home=${SOA_ORACLE_HOME} -Dsoa.instance.home=${DOMAIN_HOME} -Dtangosol.coherence.clusteraddress=227.7.7.9 -Dtangosol.coherence.clusterport=9778 -Dtangosol.coherence.log=jdk -Djavax.xml.soap.MessageFactory=oracle.j2ee.ws.saaj.soap.MessageFactoryImpl -Dweblogic.transaction.blocking.commit=true -Dweblogic.transaction.blocking.rollback=true -Djavax.net.ssl.trustStore=${WL_HOME}/server/lib/DemoTrust.jks"
Replace the highlighted text with:
EXTRA_JAVA_PROPERTIES="${EXTRA_JAVA_PROPERTIES} -Dsoa.archives.dir=${SOA_ORACLE_HOME}/soa -Dsoa.oracle.home=${SOA_ORACLE_HOME} -Dsoa.instance.home=${DOMAIN_HOME} -Dtangosol.coherence.clusteraddress=227.7.7.9 -Dtangosol.coherence.clusterport=9778 -Dtangosol.coherence.log=jdk -Djavax.xml.soap.MessageFactory=oracle.j2ee.ws.saaj.soap.MessageFactoryImpl -Dweblogic.transaction.blocking.commit=true -Dweblogic.transaction.blocking.rollback=true -Djavax.net.ssl.trustStore=/opt/11.1.1.7/admin/domains/soa_domain/aserver/certs/appTrustKeyStore.jks"
21. Import Front End Certificate Authority SSL Certificate to the Java Trust Keystore
- Obtain the certificate from the CA that signed the SOA front end url certificate.
- Login to testserver1 as oracle
- Execute "keytool" command to import the certificate to the trusted keystore:
keytool -import -trustcacerts -keystore /opt/11.1.1.7/admin/domains/soa_domain/aserver/certs/appTrustKeyStore.jks -storepass ******* -file /home/oracle/verisign.cer -alias soa.mydom.comCertificate was added to keystore
Note: If the signing CA is an intermediate authority, you will need to make one file containing both base64 certificates concatenated.
22. Start NodeManager
- Login to testserver1 as oracle
- Change directory to /home/oracle/scripts
- Execute script startNodeManager.sh
- Login to testserver2 as oracle
- Change directory to /home/oracle/scripts
- Execute script startNodeManager.sh
23. Start AdminServer
- Login to testserver1 as oracle
- Change directory to /home/oracle/scripts
- Execute script startWeblogic.sh
24. Create and Execute soaScript.py
This script automates several tasks described in the SOA Enteprise Deployment Guide needed to prepare the environment for the SOA installation. Before executing the script, you should read it carefully and update the required variables according to the environment.
It performs the following actions:
-
Enables Weblogic Plugin option on the domain
-
Creates leasing datasource
-
Sets root , stage and upload directory for AdminServer and all managed servers
-
Sets SSL Identity and trust for AdminServer an all managed servers
-
Sets replication groups for managed servers
-
Enables auto migration for SOA and BAM servers
-
Sets Transanction logs directory for all managed servers
-
Sets Front end host for SOA
25. Next step:
- Login to first server as oracle.
- Create the script soaScript.py using file soaScriptPy.docx
- Execute the script using WLST:
$SOA_HOME/common/bin/wlst.sh soaScript.py
26. Configure OHS Instance on Host testserver1
-
Login to a GUI console on testserver1
-
Execute $WTIER_HOME/bin/config.sh
- In the Welcome screen, click next
- Configure Components: select "HTTP Server" and "Associate Selected Components with WebLogic Domain"
- Specify Component Details:
- Instance Home Location: /opt/11.1.1.7/admin/instances/instance1
- Instance Name: instance1
- OHS Component Name: ohs1
- Configure Ports: Leave "Auto Port Configuration". If there is no other process using it, the configuration utility will create the OHS Process listening on port 7777
- Specify Security Updates: unselect option "I wish to receive security updates via My Oracle Support"
- Create instance.
- Copy files soa_vh80.conf and soa_vh443.conf created with soaScript.sh to the OHS instance module configuration directory: "/opt/11.1.1.7/admin/instances/instance1/config/OHS/ohs1/moduleconf". Then, restart OHS server.
cp /home/oracle/soa_vh* /opt/11.1.1.7/admin/instances/instance1/config/OHS/ohs1/moduleconf
/opt/11.1.1.7/admin/instances/instance1 opmnctl restartproc process-type=OHS27. Configure OHS Instance on Host testserver2
Repeat the steps of the previous section on the server testserver2. Change "Instance Home" and "Instance Name" for "instance2", and "OHS Component Name" to "ohs2.
28. Configure Load Balancer
At this point, the Load Balancer should be configured to balance requests between servers. All request should be received in the url http://soa.mydom.com, and should be balanced to http://testserver1.mydom.com:7777/ and http://testserver2.mydom.com:7777/, the OHS servers will take care of the doing the proxy work to the correct managed servers.
Create Managed Server Template
- Login to testserver1 as oracle
- Execute pack.sh with the following command:
/opt/11.1.1.7/middleware/wlserver_10.3/common/bin/pack.sh -managed=true -domain=/opt/11.1.1.7/admin/domains/soa_domain/aserver/soa_domain -template=/opt/11.1.1.7/admin/domains/soa_domain/aserver/soaDomainTemplateI.jar -template_name=DomainTemplate_Managed
29. Unpack Managed Server Template on Host testserver1
- Login to testserver1 as oracle
- Execute unpack.sh with the following command:
/opt/11.1.1.7/middleware/wlserver_10.3/common/bin/unpack.sh -overwrite_domain=true -domain=/opt/11.1.1.7/admin/domains/soa_domain/mserver/soa_domain -template=/opt/11.1.1.7/admin/domains/soa_domain/aserver/soaDomainTemplateI.jar -app_dir=/opt/11.1.1.7/admin/domains/soa_domain/mserver/applications
30. Unpack Managed Server Template on Host testserver2
- Login to testserver2 as oracle
- Execute unpack.sh with the following command:
/opt/11.1.1.7/middleware/wlserver_10.3/common/bin/unpack.sh -overwrite_domain=true -domain=/opt/11.1.1.7/admin/domains/soa_domain/mserver/soa_domain -template=/opt/11.1.1.7/admin/domains/soa_domain/aserver/soaDomainTemplateI.jar -app_dir=/opt/11.1.1.7/admin/domains/soa_domain/mserver/applications
31. Configure Java Object Cache for WSM_CLUSTER
- Login to testserver1 as oracle
- Change directory to /opt/11.1.1.7/middleware/oracle_common/common/bin
- Execute wlst.sh, then connect to the domain, and then execute configure-joc.py:
./wlst.sh
wls:/offline> connect('weblogic','xxxxxx','t3://adminsoa-prod.mydom.com:7001')
Connecting to t3://adminsoa-prod.mydom.com:7001 with userid weblogic ...
Successfully connected to Admin Server 'AdminServer' that belongs to domain 'soa_domain'.wls:/soa_domain/serverConfig>execfile('/opt/11.1.1.7/middleware /oracle_common/bin/configure-joc.py')
Enter Hostnames (eg host1,host2) : testserver1.com,testserver2.com
.
Do you want to specify a cluster name (y/n) y
.
Enter Cluster Name : WSM_CLUSTER
.
Enter Discover Port : 9991
.
Enter Distribute Mode (true|false) : true
.
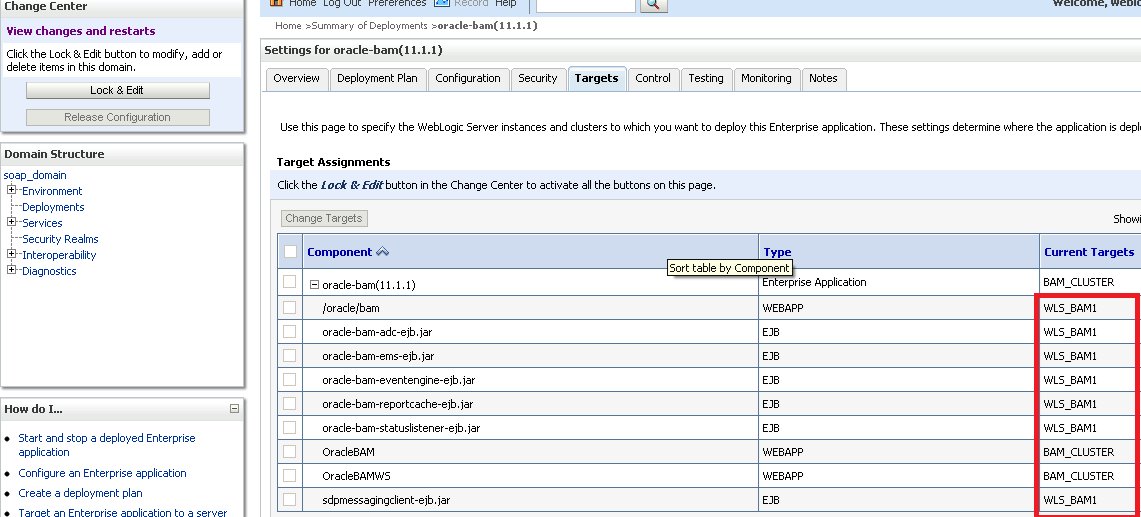
Do you want to exclude any server(s) from JOC configuration (y/n) n32. Change BAM Application Targets
- Login to WebLogic Administration Console on http://adminsoa-prod.mydom.com:7001/console
- Go to "Deployments" on the "Domain Structure" frame.
- Click on application "oracle-bam"
- Go to "Targets" tab. Click button "Lock & Edit"
- Select the following sub-deployments:
- /oracle/bam
- Oracle-bam-adc-ejb.jar
- Oracle-bam-ems-ejb.jar
- Oracle-bam-eventengine-ejb.jar
- Oracle-bam-reportcache-ejb.jar
- Oracle-bam-statuslistener-ejb.jar
- sdpmessagingclient-ejb.jar
- Click button "Change Targets", select only WLS_BAM1 as target and save.
- Select the following subdeployments
- OracleBAM
- OracleBAMWS
- Click button "Change Targets", select BAM_CLUSTER as target and save. Activate changes.
33. Start All Managed Servers
- Login to WebLogic Administration Console on http://adminsoa-prod.mydom.com:7001/console
- Go to "Environment", "Servers", the "Control" tab.
- Select all managed servers and click "Start"
- After several minutes, refresh the page, the state of all servers should be "RUNNING", otherwise, check the logs to find the errors.
33. Copy system-jazn-data.xml File to aserver Directory
After starting all managed servers for the first time, the system-jazn-data.xml file in the managed server domain home is updated to include grants for all SOA Applications. This file should be copied to the AdminServer domain home before restarting any server again, because the Managed Servers obtain their copies of configuration files from the AdminServer, and the updated file could be lost.
- Login to testserver1 as oracle
- Copy the system-jazn-data.xml file on the mserver domain home to the aserver domain home:
cp /opt/11.1.1.7/admin/domains/soa_domain/mserver/soa_domain/config/fmwconfig/system-jazn-data.xml /opt/11.1.1.7/admin/domains/soa_domain/aserver/soa_domain/config/fmwconfig/system-jazn-data.xml
34. Change OPSS Store to Database
This procedure migrates the Oracle Platform Services Store from file (system-jazn-data.xml and cwallet.sso) to inside the Oracle metadata repository created for the installation. It is needed to make sure the problems described in the previous section do no reoccur. You can check the entire explanation here: http://fusionsecurity.blogspot.com.ar/2011/10/reassociation-business.html#more
- Create OPSS schema with RCU
- Create a datasource from WebLogic Administration Console, pointing to the OPSS schema created in the previous section. It should be targeted to all managed servers a Non-XA driver with support for global transactions
- Login to Enterprise Manager, go to WebLogic Domain > Security Provider > Configuration > Configure Security Stores
- Select "Oracle Database" as store type. Enter the JNDI name of the datasource on "Data Source Details"
- On "Root Node Details" enter "cn=SecurityStore" in "Root DN" and "soa_domain" in "Domain Name"
- Accept changes
35. Configure SOA Front End Server Name
- Login to Fusion Middleware Enterprise Manager on http://adminsoa-prod.mydom.com:7001/em
- Expand "Farm_soa_domain"
- Expand "SOA"
- Select "soa-infra(WLS_SOA1)
- On the right pane, select the drop-down menu "SOA Infrastructure", then click on "SOA Administration" and then "Common Properties"
- On the "Server URLs" section, complete the blank fields:
- Callback Server URL: http://soainternal.mydom.com
- Server URL: http://soa.mydom.com
- Click "Apply"

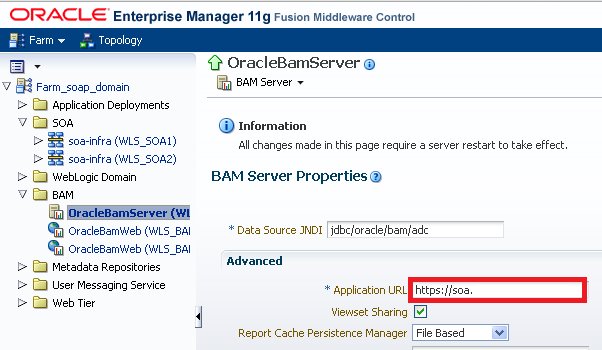
36. Configure BAM Server Front End Server Name
- Login to Fusion Middleware Enterprise Manager on http://adminsoa-prod.mydom.com:7001/em
- Expand "Farm_soa_domain"
- Expand "BAM"
- Select "OracleBAMServer(WLS_BAM1)
- On the right pane, select the drop-down menu "BAM Server", then click on "BAM Server Properties" . Complete the field "Application URL" with "soa.mydom.com", and click "Apply"
37. Configure BAM Web Front End Server Name
- Login to Fusion Middleware Enterprise Manager on http://adminsoa-prod.mydom.com:7001/em
- Expand "Farm_soa_domain"
- Expand "BAM"
- Select "OracleBAMWeb(WLS_BAM1)
- On the right pane, select the drop-down menu "BAM Web", then click on "BAM Web Properties"
- Complete the blank fields:
- Application URL: http://soa.mydom.com
- Server URL: bamprod-vip1.mydom.com
- Click "Apply".
- Repeat steps 4 to 7 with "OracleBAMWeb(WLS_BAM2)
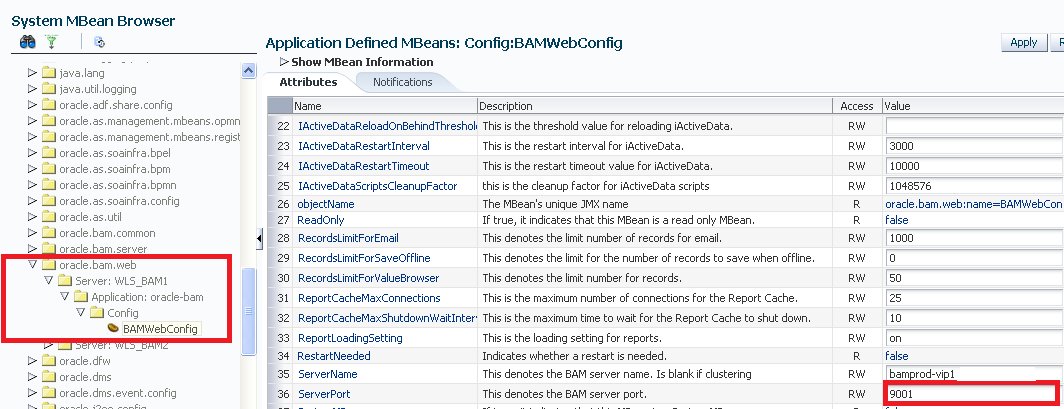
- On the BAM Web drop down menu, select “System MBean Browser”
- Expand the “Application Defined MBeans” branch, then “oracle.bam.web”, “Server: WLS_BAM1, “Application: oracle-bam”, “Config”, “BAMWebConfig”
- Change the value of the property "ServerPort" to 9001. Click Apply

38. Configure Resource Adapters for HA
In order to use the resource adapters in the SOA infrastructure, most of them have to be modified after installation using deployment plans, and then redeployed. This is usually done from the Administration Console. In an HA environment, the deployment plan must be accesible from all nodes during redeployment, so it's necessary to place them on the shared disk.
It's a good practice to modify the adapters for the first time in order to create the deployment plan in the shared directory before the developers start working on it, cause they might not be aware of the architecture and could face problems when placing it in a local directory. In the following example, the file adapter is modified to have the control directory in the shared disk (this is also mandatory):
- Login to WebLogic Administration Console in http://adminsoa-prod.mydom.com:7001/console
- Go to "Deployments" on the "Domain Structure" frame
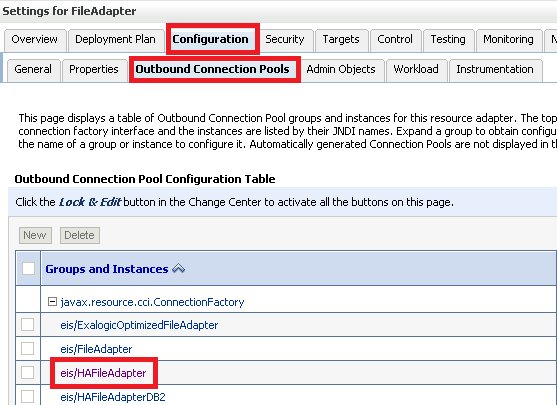
- Click on application "FileAdapter"
- Go to "Configuration" tab, "Outbound Connection Pools" subtab, and expand "javax.resource.cci.ConnectionFactory" click on "eis/HAFileAdapter"
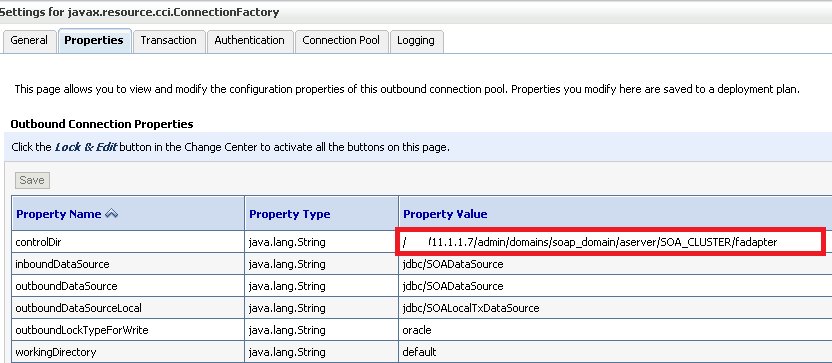
- Click "Lock & Edit" button, click on the "Property Value" cell of the property "controlDir". Enter the directory "/opt/11.1.1.7/admin/domains/soa_domain/aserver/SOA_CLUSTER/fileadapter". Press "enter"
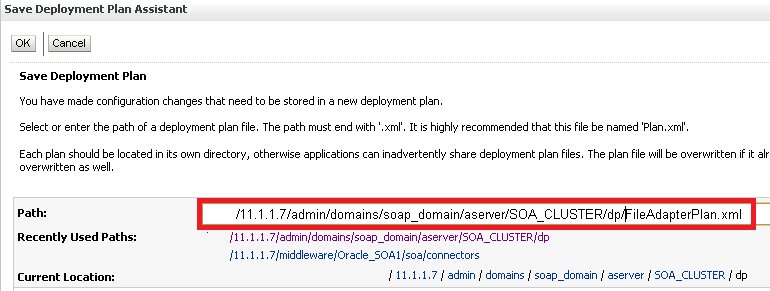
- Save the changes. Define the deployment plan on the shared directory: /opt/11.1.1.7/admin/domains/soa_domain/aserver/SOA_CLUSTER/dp/FileAdapterPlan.xml
- Click "Ok" and activate changes.
39. Configure Security Providers Virtualization
- Login to Fusion Middleware Enterprise Manager in http://adminsoa-prod.mydom.com:7001/em
- Expand "Farm_soa_domain". Expand "WebLogic Domain", select "soa_domain"
- On the drop-down menu on the right select "Security", then "Security Provider Configuration"
- Expand "Identity Store Provider". Click "Configure"
- Click "Add" button, fill the blank fields:
- Property Name: virtualize
- Value: true
- Click "Ok" to save the settings.

40. Restart All Managed Servers
Using the Administration Console, restart all managed servers.
Disclaimer - Views expressed in this blog are author's own and do not necessarily represents the policies of aclnz.com
Related Posts